Friday, November 22, 2013

Things I've Learned

The amount of work that goes into decorating a home is astounding. I'm amazed every day at how long of a process it is. Although are house is nowhere near showroom worthy and we have had our fair share of decorating failures (probably more failure than successes), I have learned a LOT in the past six months, and am certain I will discover much more in the the years to come. Here is what I've learned so far.

1. Don't buy or use anything you aren't madly in love with. The picture frames, curtains, wall decorations - these are the things I can't stand now. However, the things that I knew I wanted from the beginning are the things I'm still in love with. This goes for literally every item you bring in your house, whether it's a light fixture, art piece, accent pillow, window covering, or piece of furniture. You should love it all. If you walk by something 10 times a day and have the urge to start it on fire because you dislike it so much, how is it benefitting you to have it there?

2. Take your time. This one fits hand in hand with number 1. So much of the things we used were cheap items purchased in haste because we wanted things on the walls or needed curtains on the windows. It's okay if things look bare for a while. It will save you from having to redo things in the future. This was advice I ignored because I am such an impatient person, but trust me, slow and steady always wins the race.

3. You typically get what you pay for.  Although I am an avid Pinner and can read DIY blogs till the cows come home, I am a firm believer in this philosophy. I feel I am a creative person but I am by no means crafty. I cannot build a beautiful kitchen table from a pallet, reupholster my own couch, or make a pile of plastic cups look like a festive wreath. Paying for these items is the better option for me (although if you can pull that crap off, good for you!). DIY-ing is sweet, but not everyone can actually make it work. Your house is an investment, treat it like one. It's okay to spend some money.

4. You will fail. This is a big one for me. You will bring things home that you thought would work so perfectly, and then find them to be big flops. You will install things incorrectly. You will compromise and hate yourself for it. You will drill into wires. You will choose the wrong paint color. You live, you learn. Accept it.

5. You will waste money. I have actually found that I waste more money when I'm buying the cheaper product (see numbers 1, 2, 3). That crap I saved when I was in college that I tried to make work in our home? Duds. If you're going to have to replace it, it doesn't matter if it's 50 cents, you're wasting your dollars. You will waste less money if you consider all of the other tips while shopping.

6. Always keep the big picture in mind. Will this piece look good with everything else in the room? Will it improve the room? Will I still like it in a year? Think long term.

7. Have a "jumping off" point. Find something you love so much that you want the whole room to emulate it. If you find window curtains or a pillow that you love, start there. However, keep in mind the most limiting items. For us, our couch only came in certain fabrics, so we bought that first. The rest of the room will play off the fabric in the couch (it would've stunk if we'd done this last and needed a specific shade that they didn't offer). For bedrooms, I will probably design based on window curtains because I have such a difficult time finding fabric I like, but am flexible on wall color.

8. Always measure. And then measure again. It doesn't matter if you're buying furniture, installing a shelf, looking for wall art, or buying bins for a cabinet, measuring is key. Eyeballing rarely works, will cause you grief, and wastes your time and energy. I have started keeping measurements in my phone just in case I run across something unexpectedly and need a reference.

9. Use swatches and samples when you can. I remember when we were building we kept samples of our cabinets, flooring, and countertop with us at all times, and our kitchen is now my most favorite room in the house. All of the accents in the kitchen could be compared with the product samples, so things flowed really nicely once installed. I have learned that if I have to carry the the window curtain or pillow with me everywhere I go, I'll like the end result better. 

10. Know when to compromise. I love my husband dearly and want him to be apart of our home too. If I don't feel strongly about something and he does, we choose his way. However even though he's very invested in the process and does genuinely care to give his opinion, I am much more passionate and particular about the way our house looks. I think we have both discovered the true meaning of "happy wife, happy life" these past six months of decorating. If one of you is going to hate it, then it's not the right choice. Compromise when you can, but stand your ground when you need to.

I am hoping that we will turn a new leaf the next six months if we keep this all in mind. I have caught a second wind of decorating and am ready to wrap things up.

Monday, November 18, 2013

Guest Bath

Our guest bathroom is just a few feet down the hall from our master bedroom. It's right across from the two guest bedrooms and is probably the size of a standard bathroom. Even though we have our own master bath, this one gets used fairly often. It's closer to the living area and Andy often uses it if he has to get up really early and doesn't want to wake me up.


The walls are painted a light muddy-gray that's picked up in the flooring, which will make it easy to redecorate with new accessories in the future. The shower is a standard tub/shower combo.  The curtain and floor mat are from Target.


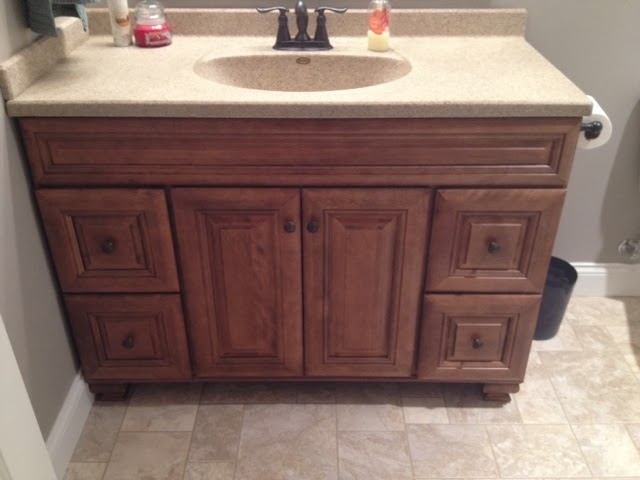
The vanity base is one we bought from a box store (Lowes), and same for the vanity top (Menards).  It's really difficult to find good out-of-the-box vanities. They all are either super junky or have no drawers/storage. This one is pretty perfect for what we needed, looks good, and is well made. It should be plenty of space for a few kids to share.


The lady bug and rose canvases for the wall were gifts bought from a local home store. The quoted canvas was made by my sister at my bachelorette party - I plan to eventually paint this the green in the shower curtain.


Not much else to say about this space! It could use a few more personal touches and decorative accents, but I'm not actively on the hunt for anything in particular.


Wednesday, November 6, 2013

Spice Cabinet Makeover

Back on the organizing front, the next project on my list was tacking the spice cabinet. This cabinet holds a bunch of random things - mostly basics for cooking like spices, oils, sauces, etc. It was pretty functional for me, but the longer that we're living here and the more things fell into the cabinet, the more I saw a need to get it in order before things got out of hand. Here is what we started with before..


Not too bad but you can see it looks pretty full/cluttered. Actually there was still a bunch of space for things, but in the back. So much wasted space! Time for some bins and an excuse to head back to the Dollar Tree..


I had gone with a plan but when I got there changed my mind a little (I didn't like the clear bins as much and found a bigger size in a solid). So I had to reconfigure a bit but like this end product much better.

First I emptied the cabinet of all contents and wiped it clean. I also cleaned all the new bins purchased. Then, I separated all the items into categories: beverages, baking basics, misc. baking supplies, larger spices, and smaller spices.


The top shelf holds items used less frequently. One bin is entirely for beverages (tea and hot chocolate mix), while the other holds random baking supplies (cupcake liners, chocolate syrup, nuts, chocolate chips, vanilla, sprinkles).


The middle shelf holds a medium bin for larger spice containers and another for cooking basics (baking soda/powder, salt, cornstarch).


I had two of the small, green bins left over from the medicine project, and they happen to fit perfectly. One is for smaller spices, while the other keeps our salt, pepper, and butter salt shakers.

I really want a label maker so I can label the lids of everything (so you can see what they are without having to life them up), but this is a great start. This project took less than ten minutes. I spent more time standing in the dollar store trying to decide which bins to buy than I did actually organizing the cabinet. Again, only a $6 project! I'm scoring.

Monday, November 4, 2013

Brains Behind the Build: Planning for the Future

Since Andy and I have big plans for our house, we kept each idea in mind when building. A lot of what we wanted couldn't be done right away because of budget, so we made sure that the layout would make it easy to complete future projects while keeping major renovations to a minimum. Some projects are small, while others not so much.

1. Library Built Ins

I would love a full wall of built in bookshelves, filing cabinets, and space for gift wrap storage. This wouldn't require any demo but would rather put our office out of commission for a few weeks. I'm hoping this project is done before 2015 because we've realized office storage is our number 1 need at the moment. Plus it would add more character and customization to our home.

2. Mudroom Bench Built-In


You know those mudrooms you see on Pinterest? They were totally the motivation for our mudroom space, but it is currently just a big open room. Andy and I both see a need for a built in bench, hooks for coats, and cubbies for outdoor necessities (hats, gloves, swim gear, etc.). It would add a lot of function to our lives, especially when we have kid gear to worry about. I'm thinking a goal time for this project is by 2016 as it shouldn't be too major.


3. Master Closet Makeover


Our master closet is pretty functional right now, but but I'd love to have proper shoe storage, drawers and to just overall maximize our space. Perhaps this will be part of my 20 year wedding anniversary gift since it's sort of ostentatious and unnecessary. 


4. Finished Basement


We are lucky enough to have a full basement, so it's a really good size, but for now it's all dark, dreary concrete. We already have a corner with the furnace, water heater, and storage shelves, which will probably always be a storage room. In the future we plan to finish the rest of the space out with a large rec/family room and one or two bedrooms (depending on our needs). There is plumbing in the basement if we ever need a fourth bathroom (that sounds totally ridiculous to me to have four bathrooms but I guess you never know). I assume this will be the first of the major renovation projects that we tackle, but will still be years from now.


5. Screened in Porch/Four Seasons Room


My parents have a smaller porch and it is such a convenient second living space. I always wanted a room with large windows on three sides where we can have a few couches, chairs, and a TV. It'd also be nice to have a table for games/eating and a walk out to the patio that we don't yet have. I have big plans for this but it may be 15 years before I have it. We put in a sliding glass door off the dining room, so tacking this space onto the house wouldn't be too difficult especially since it wouldn't require plumbing.


6. Vaulted Ceilings and Fireplace Addition

I always wanted vaulted ceilings in the living room. It was something we had to cut for budget purposes (although I have no idea how much more it would have cost). Since the space is fairly large, in my opinion the standard 8 ft. ceilings just don't fit. I'd love to bump them up and simultaneously add a fireplace and perhaps some built in cabinetry. We have a fairly long wall in the living room that needs to be broken up with something. Andy and I both grew up with fireplaces and agree they add so much to wintertime. I'm not sure how I will feel come Christmas when we don't have flames going. Part of me thinks this project will never happen but I'm so hoping it does. It's really the only project on the list that would require demo and would probably be the biggest hassle to live through.

The overall goal for home projects here on out is to add more character and function. Right now the rooms are boring boxes and need some jazzing up - whether by built ins or moldings or what have you, it just needs more character. I know that our house will be a work in process for eternity but am totally giddy thinking of all the possibilities.

Friday, November 1, 2013

Brains Behind the Build: Planning the Layout

I can't believe it has been two years since we first started planning our house. I also cannot believe that I was 21 and designing my own floor plan. It's a miracle it didn't turn out to be a disaster.

Sometimes I think it would've been nice to have a starter home to screw up and learn from, but building was not an opportunity we could pass up. Since Andy is a farmer, location was priority number one. The perfect lot came on the market when Andy was a senior in college, it's just a mile away from his parents and next door to the two major farms they operate out of. We couldn't pass it up.

The house that was there was not functional to say the least. It was extremely old, had six tiny rooms total, and would not be appropriate for a family. It made the most sense to tear it down and start over before we got married so we didn't have to move in and out and back in again.

We had been planning for this for years and had a good idea of a floor plan right from the get go. It was important to us to do it right. If we're going to live in this house till we die, we didn't want any regrets. We tried to put a lot of thought into every decision and did A LOT of research. Our number one priority was the sizing of the rooms, since it isn't so easy to add two feet on to rooms here and there.

With input from our families, we were ready to go. Here is approximately what we came up with (this was the layout we made on our own and not the official one, but the overall design is the same).


I'll start from right to left with the explanation.

I had wanted a slightly-bigger-than-normal garage. I wanted to be able to easily unload the car of groceries and kids without having to worry about denting or squeezing around Andy's truck. Andy wanted a monster size garage. Now that it's complete, it's gigantic. We seriously could've shaved a few feet off both directions, but I guess that's a good problem to have. We will easily be able to store bikes and toys if need be. We also have a fridge and deep freezer in there with no problems.

I also wanted a mudroom that was tucked out of the way. Andy comes home from work dirty and greasy almost every day. I wanted to be able to tuck away the boots and have a space to drop the muddy clothes. It was also important that we have a space to keep shoes and coats. They always land by the garage door anyway so why not plan for it ahead of time? Plus there is a large closet in the corner (not shown) which stores all his dirty Carhartts and all of our winter coats - easy access for when we leave the house!

Andy's parents pretty much insisted we needed a bathroom by the garage, and I am so thankful that we have one. If Andy needs to use it any time throughout the day, he can come inside without tracking mud throughout the house. It will be nice when we have kids playing outside too - they can just run in with their shoes on and I won't have to clean up. The shower doesn't get much use but that may change as the years go on.

I had always envisioned the kitchen to be in the back corner of the house, overlooking the back yard. It will be easy to take food outside if we ever have a back patio. Plus my parents made a note that it's easiest to unload groceries when the kitchen is close to the garage. We don't have to schlep them across the house.

It made sense to have the dining area adjacent to the kitchen. I always pictured it in the back of the house, too. Plus when considering the location of other rooms, this spot made the most sense.

I wanted the living room to overlook the front. It's nice to see when people are pulling up to the house. Plus, I wanted it close to the front door so guests don't have to trek far. We knew we didn't need a formal living room and family room, so we opted for one larger space.

We knew we needed a separate designated office. There was no need to add an extra "bedroom" when we knew fully that it would never be used as such. Plus, I'd always wanted a library of sorts. It was a necessity that the office be off the front door. Not only did it make most sense with the layout, but we were also considering if Andy has seed clients over, it's easy to go into the office to meet (not now though since the office currently looks atrocious).

Laundry is usually an afterthought for most people, but I didn't want it to be. I wanted a good size space that could keep plenty of laundry baskets and had room for folding clothes. Notice how we don't have any random hall or linen closets? People comment on the size, but honestly, we just opted for no small closets and made this room larger. We can keep all our cleaning supplies and linens in this space. I think it's smart and makes a lot of sense, at least for us. Plus it's in a really convenient location and I don't have to lug clothes very far.

The master bathroom and closet locations were up for debate. People kept telling me it'd be easier to run plumbing on the inside of the house, but I was adamant I wanted a window in the bathroom. We wouldn't need a window in the closet because the wall space would be needed, so it made more sense to me to put it on the inside of the house. Plus, it landed next to the laundry room so we were able to put in a pocket door connecting the two. Best. Idea. Ever. Putting away clothes is so much easier. I literally walk two steps.

I love that the master bedroom is in this corner of the house. We are able to have two good sized windows so it is glorious to wake up in this bright and cheery space. We have plenty of room for two dressers, two night stands, and a king sized bed (although now we just have a queen) - we even have some room to spare.

The other guest bedrooms fell into their respective places. It will be convenient to be close when we have kids, but our doorway is tucked a bit down the hall so we have (sort of) some privacy. Each room is just big enough to be shared by two kids if necessary, but in my opinion is perfect for one child to have on his/her own. The guest bathroom fits perfectly across the hall - super convenient for guests and future kiddos.

Not bad for a layout designed by two kids! So far it has worked well for us and I'm not kicking myself for any bad choices made.