Showing posts with label Organization. Show all posts

Wednesday, October 7, 2015

Baby Clothes Storage

Have I ever mentioned how much I love organizing Elliott's clothes? I get excited to do her laundry and her room is always tidy. The dresser drawers are no exception.

The room has two dressers, plus a large closet. Let's take a peak...


The dividers are from the Container Store. The depth is perfect, and we have just an inch or two extra on width. 


Here is the top drawer. It houses all of Elliott's bows, scarves, and hats. The left bin has her bib scarves, hats, and headbands that she has grown out of. The middle is all clips. I got a big set and sorted them by color. I keep the clips on their original cardboard strips, which fit perfectly in these dividers. Keeping them on the cardboard strips keeps them in order, I can see everything, and they don't get gnarly or broken. Win! The right bin houses her current headbands with a few other clips that don't belong in the big set. I have one slot for 3-6 month size and another for clips, otherwise 6-12 month headbands are sorted by color. The biggest reason this setup is so great is that I can constantly keep inventory and know if anything is missing. We haven't lost any bows yet and I thank this system for that! It also is super duper easy to find what I'm looking for.


The second to top drawer houses bottoms. The back left section for shorts, the front left for bloomers. The middle keeps leggings sorted by color (a few pairs were in the laundry). The right bin keeps folded jeans since those aren't as easily rolled. Again this makes it easy to find everything since it's all completely visible. I also really enjoy putting together her outfits because of it.


The middle drawer keeps clothes she's grown out of that I haven't had time to put in storage yet.


The bottom two drawers keep her knitted blankets, extra crib sheet and changing pad, as well as a few miscellaneous items. Nothing special about these since they aren't used much.


The other dresser...


The top left keeps swaddle blankets and burp cloths for easy access. Rolling is the way to go peeps! And I know people think I just do it for pictures, but no, the drawers have stayed this way for the past 6+ months.


The middle left drawer is for footwear. More bins from the Container Store allow each pair of shoes to have a home. The right bin keeps socks, as well as swimwear.


The bottom left drawer stores clothes that Elliott doesn't quite fit into yet that aren't hanging clothes.


The top right drawer keeps the cloth diapers. I don't fold the covers and I keep the prefolds flat. It's organized chaos but this works perfectly.


The middle right drawer is general healthcare and grooming. I had two random orange bins that I used to corral items with - one for diaper rashes and general bum care, another for general grooming items. I needed easy access to items like the lotion, hair brush, and nail clippers since they are used frequently. I put down some shelf liner and now each has a spot without needing a bin, and I don't have to worry about them moving around the drawer.


The last drawer on the bottom right keeps carriers, wraps, and sleep sacks. 


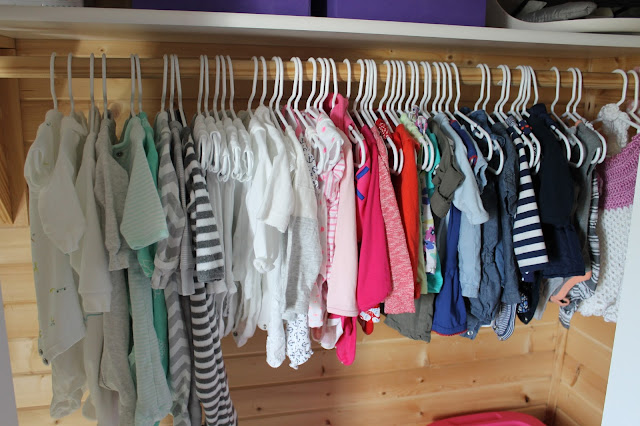
Onto the closet! It has two sets of folding doors. This side displays the clothes in Elliott's current rotation. On the left are sleepers, followed by everyday wear to the right (tops, rompers, dresses). Both categories are sorted by color so I can always find what I'm looking for. Again, I like planning her outfits because of this!


On the right hangs clothes she doesn't fit into yet. Because little kids grow so fast, I always have a stash of the next few sizes up. I use Happy Baby closet dividers to keep it all straight and would recommend.

With this system in place, I can constantly see what Elliott does or doesn't need as far as clothing. It's all incredibly simple to maintain, as well. This also prevents me from over buying things- especially when it comes to sizing since it's all sorted. It's crazy how happy this makes me. 

Tuesday, June 24, 2014

Storage Room Overhaul

Truly, there could not have been a more perfect time for us to get married. We got to dump our cheapy college stuff and use our wedding gifts for the most part. But "out with the old, in with the new" meant we had collected a pretty big pile of garage sale/junk items. I nicknamed one of our extra bedrooms "The Monica Closet" because it was literally a dumping ground for things we weren't using. Here is the before..


Yeah..

I made it a point to try to find permanent homes for things we were actually keeping. And thankfully, a few weeks ago we had a pretty successful garage sale to get rid of everything else. We started with 8 big totes of things (plus a trailer of furniture) and only came back with ONE TOTE! Now that we had purged, I was ready to tackle our storage space so we could keep up with minimal clutter long term.

Just before we moved in, the local K-Mart went out of business. They sold all of their shelving, and we were lucky enough to snag some. It is really perfect for a storage room, and we immediately started loading it up with random items (in addition to the crap in the guest bedroom). From the get-go, we did really well about buying bins, but things weren't really organized or labeled properly.

I totally snagged this idea from this post at iHeart Organizing, but it was too brilliant to not put this system to use. We already had plenty of big bins, so we only put in a few bucks for Scotch laminating sheets and were ready to roll! I just made some title pages (which took 2 seconds in Word) and slapped the laminated sheets to them and placed them on the appropriate bins. Then I just used a regular dry erase marker to write the specific items kept within the bin. (Previously we taped on printed sheets that had the items typed up, but when things get taken out or rearranged you have to make a whole new label, plus since they were just paper they got dirty and torn pretty easily).


The front side is still not very pretty, as it is still random. (but how pretty can a storage room be, really???) Basically we have a little tool section (which is another project for another day) and a few banker's boxes for old files that we don't need to access but can't toss just yet. Again, this area I didn't really touch with this project so it's still messy.


Then random home stuff (shower/curtain rods, carpet samples, etc) followed with a big section of just empty product boxes. I'm hoping to eventually toss these but haven't committed - do people keep that stuff??


On the bottom shelf, I placed all of the more temporary items or things we are trying to get rid of. For example, the things we weren't successful selling at the garage sale went back here. As we collect such items this is where they will go. Here you can see a closer look at the actual labels..


The end is our little luggage station. The far end in the back corner of the room has always housed our paint and paint supplies - totally untouched and will be revisited at some point. 


The back side of the shelf keeps more permanent things. On the far end will be our "memory bins" of things saved from our childhoods. Andy's is there now, but I just got all my stuff from my parents' house and it needs a better system, so we will be revisiting that.


Then we have empty banker's boxes followed by a whole section of seasonal decorations. I wanted each season to be limited to one bin to prevent over-buying. Right now these are mostly half full, so if they ever do become full it will be plenty. Christmas sort of won though, since we have the tree box, a regular bin of decorations, a few small ornament boxes, and a box just for string lights. It really is not that much stuff when you think about it. I also have one bin for non-Christmas winter items, because winter doesn't end in December and then I can easily keep the snowmen out for a little longer without creating a big hassle. Fall has a bin, but we don't have a spring/summer because those decor items are out right now (not that we really have any). Those 2 seasons will be limited to one bin, hence that open space.


This system (although we are still working on downsizing and arranging) is seriously the bee's knees. It is so nice and easy to get out and put things away, and no climbing over crap to search for your things. I always know exactly where everything is, and it should be a piece of cake to maintain. Seeing it all makes me feel like we have so. much. stuff. But when I remember that this is where we store EVERYTHING coupled with the fact that the bins aren't full, makes me feel a little better. There is always more work to be done, but at least our guest bedroom is now completely junk free! Seriously, vacuuming that room when I got it all clear was like Christmas morning! Motivation to keep up with the work.

On to the next thing..

Thursday, February 27, 2014

Under the Sink Storage

This post may put you to sleep, but I'm an organizing lover and figuring out a solution for random kitchen storage has taken me a while to perfect. I really have moved things around a lot and have finally found the best solution, so I figured I should share. It's strange how happy this stuff makes me.


Anyways, when we first moved into our home, the only cleaning supplies that were stored under the sink were dishwasher detergent and dish soap. There were other random things, but nothing had a place.. it served no function really.


Sorry, that picture was taken with my iPhone, pre-Canon. My dilemma was basically what products do I keep here, and how should I do it? We had 3 kinds of garbage bags stored in 3 different places throughout the house. After switching things around for a long time, I finally found a balance.


Ignore the lack of prettiness, but now each item has a specific spot and is completely accessible. All of these items are used solely in our kitchen. I don't have to come to the kitchen for anything I need to use in the bathroom, etc. I also never have to leave the kitchen to find an appropriate cleaning product. I was also growing tired of heading to the pantry for our mini sweeper. It is obviously dirty and I wanted to avoid keeping it where we keep food/food products. The same goes for the fly swatters.. we had been just lying them on the counter (ew). Enter a solution from Command hooks thanks to a random Target trip!


These little guys were perfect, and on clearance for $1.89 I think. SO. Happy. 


There was also this other issue...

Towels for drying the dishes. I do a handful of dishes every night and I always set them to dry on a pair of towels next the sink. Obviously they don't really get dirty, so I keep them around for multiple uses. I was keeping them under the sink but it started to gross me out a little, particularly once we started keeping the little duster in there.

So I got to thinking about other open spaces in our kitchen. We have this awkward cabinet just across from the sink in the island that wasn't being put to good use. 


I transferred over a few bins I had to fill it up (it's quite deep). One bin keeps the towels for drying in between uses, the other keeps dirty dish rags. I use a new rag each time I do dishes (no sponges here), so they pile up on the counter fairly quickly. And then I would take them to the laundry room and they would pile up on the floor until I had a full load of towels. Not ideal.


 Yep, these are dilemmas of my life. But solving them makes me pretty giddy, no matter how simple.

Wednesday, November 6, 2013

Spice Cabinet Makeover

Back on the organizing front, the next project on my list was tacking the spice cabinet. This cabinet holds a bunch of random things - mostly basics for cooking like spices, oils, sauces, etc. It was pretty functional for me, but the longer that we're living here and the more things fell into the cabinet, the more I saw a need to get it in order before things got out of hand. Here is what we started with before..


Not too bad but you can see it looks pretty full/cluttered. Actually there was still a bunch of space for things, but in the back. So much wasted space! Time for some bins and an excuse to head back to the Dollar Tree..


I had gone with a plan but when I got there changed my mind a little (I didn't like the clear bins as much and found a bigger size in a solid). So I had to reconfigure a bit but like this end product much better.

First I emptied the cabinet of all contents and wiped it clean. I also cleaned all the new bins purchased. Then, I separated all the items into categories: beverages, baking basics, misc. baking supplies, larger spices, and smaller spices.


The top shelf holds items used less frequently. One bin is entirely for beverages (tea and hot chocolate mix), while the other holds random baking supplies (cupcake liners, chocolate syrup, nuts, chocolate chips, vanilla, sprinkles).


The middle shelf holds a medium bin for larger spice containers and another for cooking basics (baking soda/powder, salt, cornstarch).


I had two of the small, green bins left over from the medicine project, and they happen to fit perfectly. One is for smaller spices, while the other keeps our salt, pepper, and butter salt shakers.

I really want a label maker so I can label the lids of everything (so you can see what they are without having to life them up), but this is a great start. This project took less than ten minutes. I spent more time standing in the dollar store trying to decide which bins to buy than I did actually organizing the cabinet. Again, only a $6 project! I'm scoring.

Wednesday, October 23, 2013

Master Bath Drawer Makeover

I am someone who enjoys order, almost at an unhealthy level. As I said before, I'm sort of on a roll with organizing projects. I thought a good place to focus this energy would be in our master bath drawers.

When I showed our master bathroom here, you saw that we have plenty of storage. However, having a good amount of space doesn't automatically mean you use it well. I wanted to get things ordered before we accumulate too much junk and organizing becomes more difficult. I started with two drawers - the main one I use and the main one Andy uses.

Let me show you what we started with. Someone get me a DSLR..


This was my drawer, not bad at all. You can get to everything, but I didn't like that each time I open and shut it everything would slide toward the back. And it isn't super appealing.


Remember that cardboard box full of Andy's meds? Yeah, there was a boatload of teeth/mouth products in there too. All of that needed to find a home.


And here is Andy's drawer. You can see everything, but again things slid around and it just looks messy.

Now that I had a starting point, I was on a hunt for drawer dividers..

The first step is to measure your drawers. I have gone to the store without doing this before and it becomes a big guessing game. Just do a little prep first and you can get the most out of the process, but I've learned that you will probably never find the perfect size. Be prepared to play divider Tetris. I ended up at Wal-Mart (my absolute least favorite place in the world). They did not have much variety at all, but the one kind they had worked for me. I ended up with two different size Rubbermaid dividers. I like them because they connect to each other, are lined with rubber, and also have stoppers on the bottom so nothing slides whatsoever. They are sort of expensive ($5 for the 6"x9" and $4 for the 3"x9") but I think they are well worth it.


Next, remove everything from the drawer and wipe it clean. After separating your goodies, you can file them away oh so nicely...


So. Much. Better. I fit twice as much stuff in the drawer and it looks even better. And now it is more of a shared space.


The back bin is entirely for floss - wow. Andy and I can both floss three times a day for the next five years and we'll still have some left over. I would've tossed some of this, but we had the space to spare. See my little nail polish bin? I can see all my colors!


Also in excess: toothpaste. I think we're good on travel bottles for the next five years, too.


My random makeup items were placed in their own bin. The back corner holds my make-up brush travel case and large compact. I don't keep my brushes in the case unless I'm traveling so this set up is perfect.


Last but not least, Andy's drawer. Can you smell the Axe through the computer? He's a pretty fresh guy.

Total cost of this project came to approximately $30 - all bins. The bins should last a long time and I'm giddy over the organization. It's all about baby steps with this home stuff..